Posts

Showing posts from May, 2021

Refresh a region on change of tabs in Region Display Selector in Oracle APEX

Image
Region Display Selector   i s a Region component that provides a page level navigation control for other regions on the with the  Region Display Selector  property set to  Yes . It can be configured to work in two modes: View Single Region  Show regions as tabs. Selecting a tab will make the corresponding region visible and hide the other selections. Scroll Window  Always display all the regions on the page. Selecting a tab will scroll your window to the corresponding region. Follow the instructions below to add a Region Display Selector to your own pages: 1)   Create a  Region Display Selector  region and place it in the  Breadcrumb  region position on your page. 2)   Modify the other regions on the page and set the  Region Display Selector  property to  Yes  for the regions that you want to appear in the Region Display Selector. 3) Provide a static ID to the region which that has to be refreshed on change of a tab. In this example it is " RDS_EMP ". 5) Paste the below code
IG Hack - #1, Add a custom action to the Actions Menu in Interactive Grid in Oracle APEX

Image
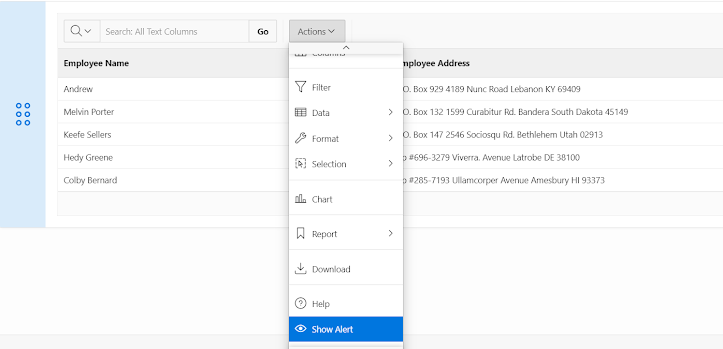
Interactive Grid is the power house of Oracle APEX. It provides us with several out of the box features. This blog explains how to add a custom action to the Actions Menu. 1) Create an Interactive Grid.  2) Provide a Static ID to the Interactive Grid. (In this example it is emp). 3) Paste the below javaScript code in the Execute When Page Loads section.       $("#emp_ig_toolbar_actions_button_menu").menu("option").items.push({ type: "action", id: "upload", hide: false, label: 'Show Alert', icon: 'fa fa-eye', action: function() { alert('Alert Triggered Successfully'); } });           In the above code,  emp must be replaced with the Static ID that you have provided.     The values of  id , label , icon can be replaced with any other text/icon, based on the requirement.     As a result of the abov

Show custom headings for a shuttle item in Oracle APEX

Image
  SHUTTLE  item type is used for multiple values manipulation in Oracle APEX. This blog explains how to set custom headings for the Shuttle Item. 1) Create a Shuttle Item (In this example it is P28_COLORS_SHUTTLE). 2) Paste the below javascript code in the  Execute When Page Loads  section       $('#P28_COLORS_SHUTTLE table').prepend('<tr><td colspan="2"><b>Colors</b></td><td colspan="2"><b>Selected Colors</b></td></tr>');       The above javaScript code can be customized by adding color, changing the font weight etc..       Note: P28_COLORS_SHUTTLE must be replaced with the Item Name that you have created.    Before adding the code    After adding the code Click here for  DEMO References:  https://docs.oracle.com/database/apex-5.1/HTMDB/understanding-page-level-items.htm#HTMDB25304    (Section 13.1.5.3) HAPPY CODING!!!  Thank you :) 

Get the Display and Return value of a Popup LOV item using javascript in Oracle APEX

Popup LOV is the most common LOV type used in Oracle APEX. This blog explains how to get the Display and Return value of a Popup LOV using java script. 1) Create a Popup LOV item (In this example they are P1_COUNTRY_LOV ) 2) Create two page items to store the captured display and return values.     (In this example they are  P1_COUNTRY_DISPLAYVAL ,  P1_COUNTRY_RETURNVAL ) 3)  Create a Dynamic action          Event:  Change         Selection Type:  Item         Item:  P1_COUNTRY_LOV 4) Create a True Action      Action:  Execute JavaScript Code      Paste the below code: //to get the return value of the popup lov let returnVal = apex.item("P1_COUNTRY_LOV").getValue(); //to get the display value of the popup lov let displayVal = document.getElementById("P1_COUNTRY_LOV").value; //to set the captured value to page Items (for using the captured values in any other event) apex.item("P1_COUNTRY_DISPLAYVAL").setValue(displayVal ); apex.item("P1_COUNT